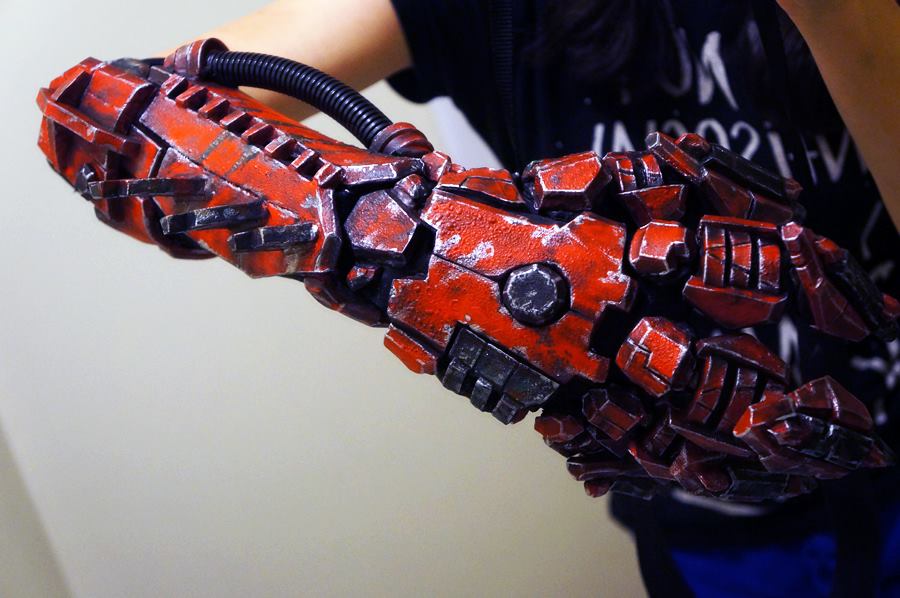
How to Make Foam Look Like Old Metal

Does the texture on this creepy old robot claw look like you need a spray booth and expensive materials to make?
It’s actually really easy to do this at home and all you need is a dollar store*
*NOTE: this technique works on any medium density, closed cell foam sheets. Check the FAQ below for an explanation why.
Here’s what you need:
• Closed cell foam
• Acrylic Paint
• Brushes
• Hair Dryer
• Optional: Satin or Matte Clearcoat
Step 1: Make sure your foam piece is clean of dust and debris. Paint on a base coat with acrylics straight out of the tube, do not mix them with water – I like to use black paint for this but if you’re going to paint your foam with a lighter finishing colour use a lighter base. You’ll start to see the paint soak into the foam as it dries.
Step 2: Add several more coats until you get an even finish on your foam, covering all the pores. It’s OK if the brushstrokes are visible.
Step 3: Set your hair dryer to the highest setting. Pass over your foam with the dryer, keep it moving so the heat is evenly distributed over your painted surface. You’ll start to see the paint bubble up very quickly, when it’s sufficiently bubbly remove the dryer. What’s happening is that the trapped gas inside the foam heats and pushes upward while the foam pores constrict, causing the bubbles in the paint which then deflate slightly into pockmarks when your heat source is removed. The longer you heat the foam, the larger the bubbles (and the bigger the pockmarks).
*NOTE: If you want smaller bubbles, give your foam sheets a few passes over with a hair dryer to close up pores before painting on your base coat
Step 4: Apply your finishing colour to the textured foam. It doesn’t have to be perfect. Use a combination of drybrush and wetbrushing techniques to weather your foam and make it look extra grungy.
Step 5: Seal the finished piece with a clearcoat of your choice. (optional)
Tips and Tricks
Weathering Tip #1: Drybrush the edges of your pieces with silver acrylic paint. Metal paint (which we’re trying to mimic) shears off of exposed edges when they’re hit.
Weathering Tip #2: Mix burnt sienna with a drop of black paint and apply inside and around the seams between your foam ‘plates,’ then stipple on more burnt sienna and a few speckles of phthalo green. You can also add this effect in and around your ‘silver’ areas. Rust typically forms where water can pool in, and also will eventually form on exposed metal edges.
Weathering Tip #3: Want scorch marks? Apply black paint on the spots you want scorched, then add a “halo” of burnt sienna around and fading into the black. Airbrushes are fantastic for this. For even more grunge, add silver specks where the scorch marks would have flaked off to reveal the ‘base metal’ underneath.
What foam should I use?
There are two main kinds of foam: open cell and closed cell. Open cell foam is light and spongy with wide open pores; it’s typically used in furniture upholstery and it will not work here.
Closed cell foam has much smaller pores and can be shaped and molded when using a heat source. It also comes in different shapes, sizes, and densities. The most common type you’ll see is 3mm (⅛”) thick sheets of craft foam that you can find at the dollar store. However you can also get thicker rolls, and even extruded shapes like bevels, hemispheres and tubes.
For this tutorial I used 2LB XLPE (cross-linked polyethylene).
Can I use styrofoam?
No, styrofoam is an open cell foam so it won’t work here.
What paints should I use?
Most acrylic paints work fine for this application. In general you want something that doesn’t dry rigid or brittle: foam is flexible so you want something that will be able to bend without cracking. Choose your paints (and by extension, clearcoat) depending on the kind of use you expect your prop to have. Remember though all paints will crease because foam will always outstretch paint.
Can I use spray paint, or an airbrush?
It depends on the product, some water-based spray paints will work fine, but others can eat away closed cell foam. Always test out a product you aren’t sure about on a scrap of material before using it on the finished piece. As for an airbrush, absolutely you can use them, just make sure to use acrylic paints and use the right reducer for your chosen brand of paint.
